Introduction
Alex: Hey everybody. Looking forward to talking to you today about the new Embedded Cluster. If you were with us at our last RepliCon, we talked about this as well. We've got some updates to share and reiterate some of what we're working on here.
Let's start with a little bit of an overview. What exactly is Embedded Cluster?
Embedded Cluster is a total redesign of kURL to help you ship your application and a Kubernetes cluster as an appliance that's easy to install, update and manage. If you're familiar with replicated and you're familiar with our open source kURL project, it's basically a way to construct a Kubernetes distribution and deploy that onto a customer's virtual machine or bare metal server, deploy KOTS on top of that, and then be able to install your application anywhere, even if your customer does not have a Kubernetes cluster already.
Embedded Cluster is the same idea, has the same general goal, but improvements to the user experience, to the usability, the supportability, etc.
To that end, what are some of the benefits of the new Embedded Cluster? Compared to kURL, the installation is about four times faster. Chuck was just talking about the cloud marketplaces and he was using this new Embedded Cluster as the basis of that cloud marketplace offering. The faster installation is one of the pieces that makes that much more feasible because it's going to come up a lot quicker, fewer host dependencies and greater operating system support. The Embedded Cluster is based on the k0s Kubernetes distribution, which is statically compiled. It's a single binary that runs on any of the nodes that you're joining to the cluster.
We don't have to bring our own because it's statically compiled. We don't have to download all of our own host dependencies to that box like we do with kURL, which would lead to conflicts. Everything you need is baked into Embedded Cluster. There's fewer dependencies - if you have a Linux kernel, it's basically going to work.
Another benefit here is that because we're leveraging an upstream project, when new operating systems come out it's going to be much easier for us to support them through that upstream project. As opposed to replicated always having to do the work we had to do with kURL to support the latest version of Rail or Amazon, Linux or whatever it might be.
One of the big goals here is for there to be a lesser requirement for Kubernetes knowledge or interaction from your customers that are installing this. We want to abstract Kubernetes away as much as possible. One of the ways we do that is through this redesigned admin console experience where your customers can orchestrate the application and the cluster from the UI.
In line with the software appliance idea, the application and the cluster should get updated together. Again, if you're familiar with kURL, you have to update the cluster separately from the application, and one of the values here with a new Embedded Cluster is being able to just click a button in the admin console to deploy a new version of the application. That will transparently update both the application and the infrastructure, the cluster and whatnot. Next is enhanced multi-node cluster support, making it easier to extend your cluster beyond a single-node.
Introducing the Embedded Cluster single-node Beta
We announced this a couple of weeks ago now, so we've been in Beta for a little bit. This is specifically focusing on single-node. As I mentioned, multi-node support is a big part of Embedded Cluster. It's in Alpha right now. But, we have a Beta available for online single-node installations. We've got a lot of people testing out Embedded Cluster and we're excited about this getting us closer to GA with this product.
Configure an Embedded Cluster
Let's start with: How do you configure an Embedded Cluster?
As a software vendor: How do I get started using this?
The configuration happens through the Embedded Cluster config, which is a resource that you include in a release. By putting this Embedded Cluster config into one of your releases, that enables the use of Embedded Cluster. The Embedded Cluster config defines the Embedded Cluster that's going to be deployed, the Kubernetes version, the Embedded Cluster version that's going to be used, as well as other modifications to the cluster, other customizations, or settings that you can configure.

This example here is just the most basic Embedded Cluster config, which merely specifies the version of Embedded Cluster that's going to be used. In this case, Kubernetes 1.29.2 is going to be deployed, and then the +ec.3 shows that this is our third Embedded Cluster release for Kubernetes version 1.29.2.
This is the simplest Embedded Cluster config that you can define, but there are other things that you can configure through this Embedded Cluster config, which we'll see in the hands-on demo. We talked about specifying that Kubernetes version, but you can also deploy additional Helm charts.
This was a pretty heavily requested feature in kURL that never came to fruition - the ability to be able to specify additional resources that you want to deploy as part of the cluster, prior to your application being deployed.
For example, if you have existing cluster customers and you tell them, ‘Hey, you need to deploy Istio or Keycloak or cert-manager or whatever it is before you deploy our application,’ this gives you a corollary for Embedded Cluster where you can specify those Helm charts as part of the cluster that's going to get deployed before your application gets deployed.
Then you can also modify the cluster, which we'll see in our demo here - the ability to modify some of the Kubernetes settings and some of the lower level stuff. We'll talk about what the trade offs or caveats are with that approach.
Demo:
Configure
Let's get into a demo of the configure step here. The first thing to note is that if you want to use Embedded Cluster, the best way to do that is to create a customer.
From that customer, there is a license option called Embedded Cluster enabled. By setting this, it lets you download the binary to install Embedded Cluster and it enables this customer for Embedded Cluster. This is done on a per customer basis so you can test it out without having to roll it out to all of your customers if you're not ready for that yet.
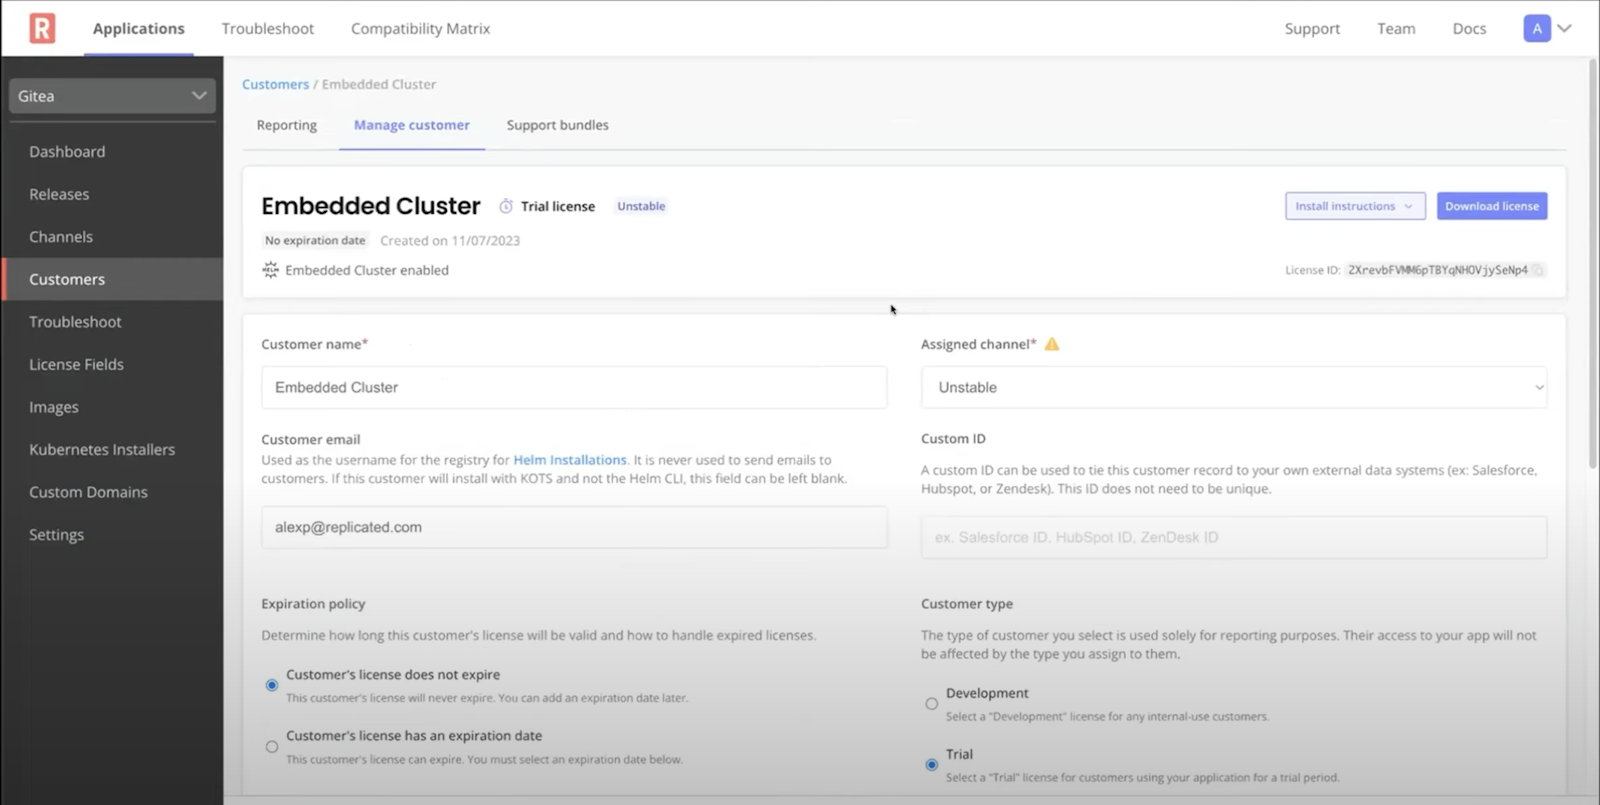
That's the first step. I've got this customer Embedded Cluster enabled. Then we want to go and create a release and include an Embedded Cluster config in that. I've already done that in this release here.
You can see the simple Embedded Cluster config where I'm specifying version 1.28.7+ec.3. We're going to deploy Kubernetes 1.28.7 and then we've got a couple other sections. We'll talk a little bit less about roles today. I've mentioned this in our last RepliCon presentation, feel free to check that out for a bit more information there.
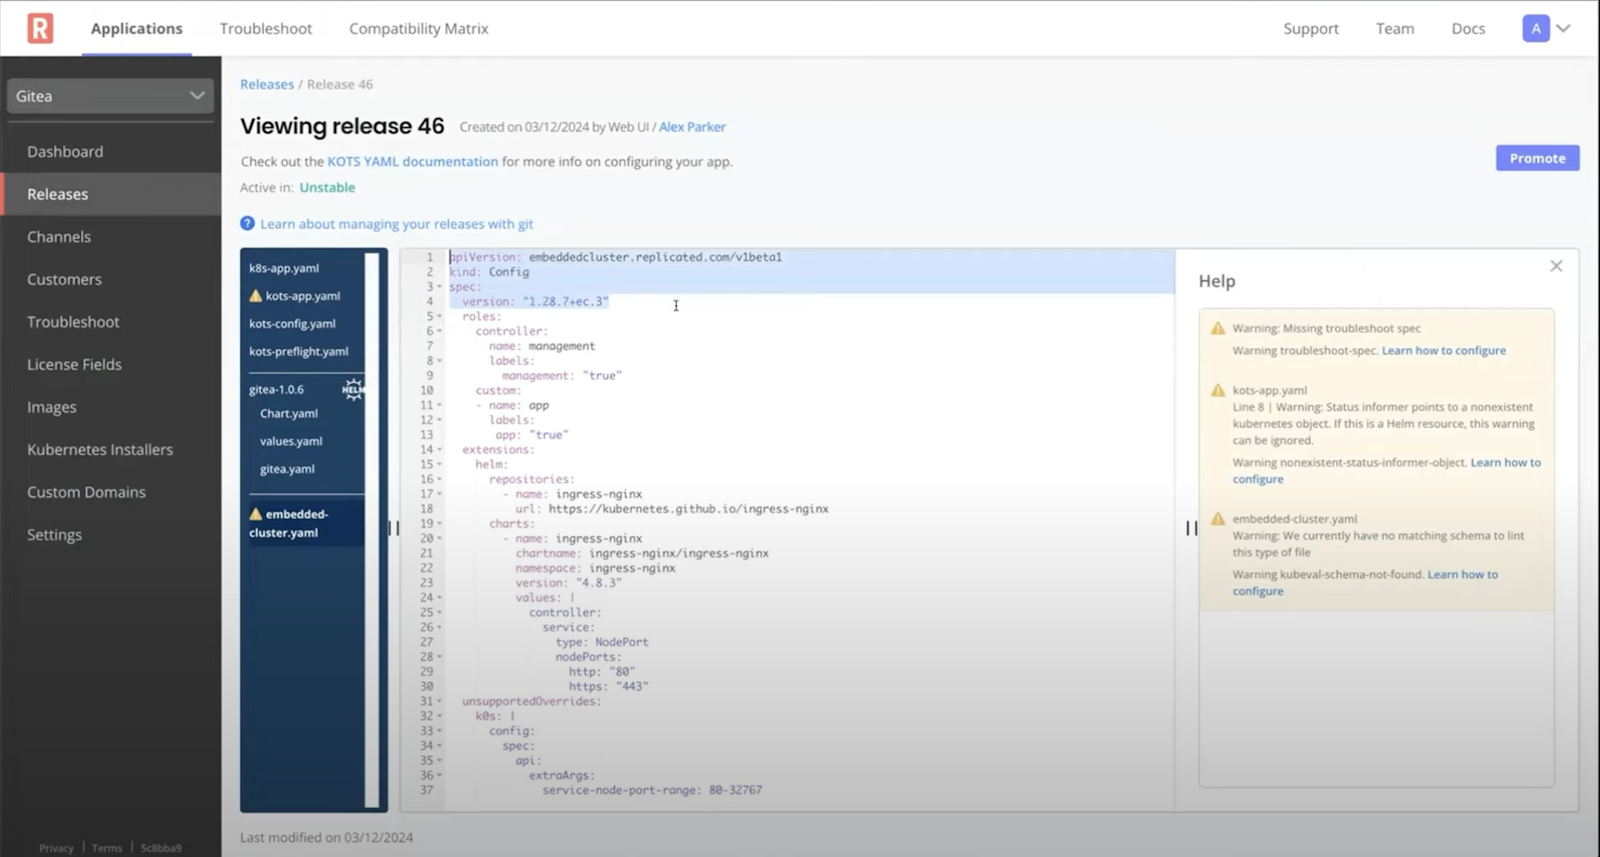
This is particularly useful for multi-node support. If you have, different labels. For example, Kubernetes labels that you would want to be applied in a multi-node cluster to different nodes in that cluster. You can use this concept of roles to basically abstract those Kubernetes labels away from your end user. They can choose roles to assign to nodes when they join nodes to the cluster.
Those roles are associated with Kubernetes labels that will automatically get applied to the cluster when the node is joined. This is a way to better support multi-node and again abstract that Kubernetes specific kubectl commands away from your end users.
The two sections we'll talk about a little bit more here that weren't mentioned in the last presentation are this Helm extension section.
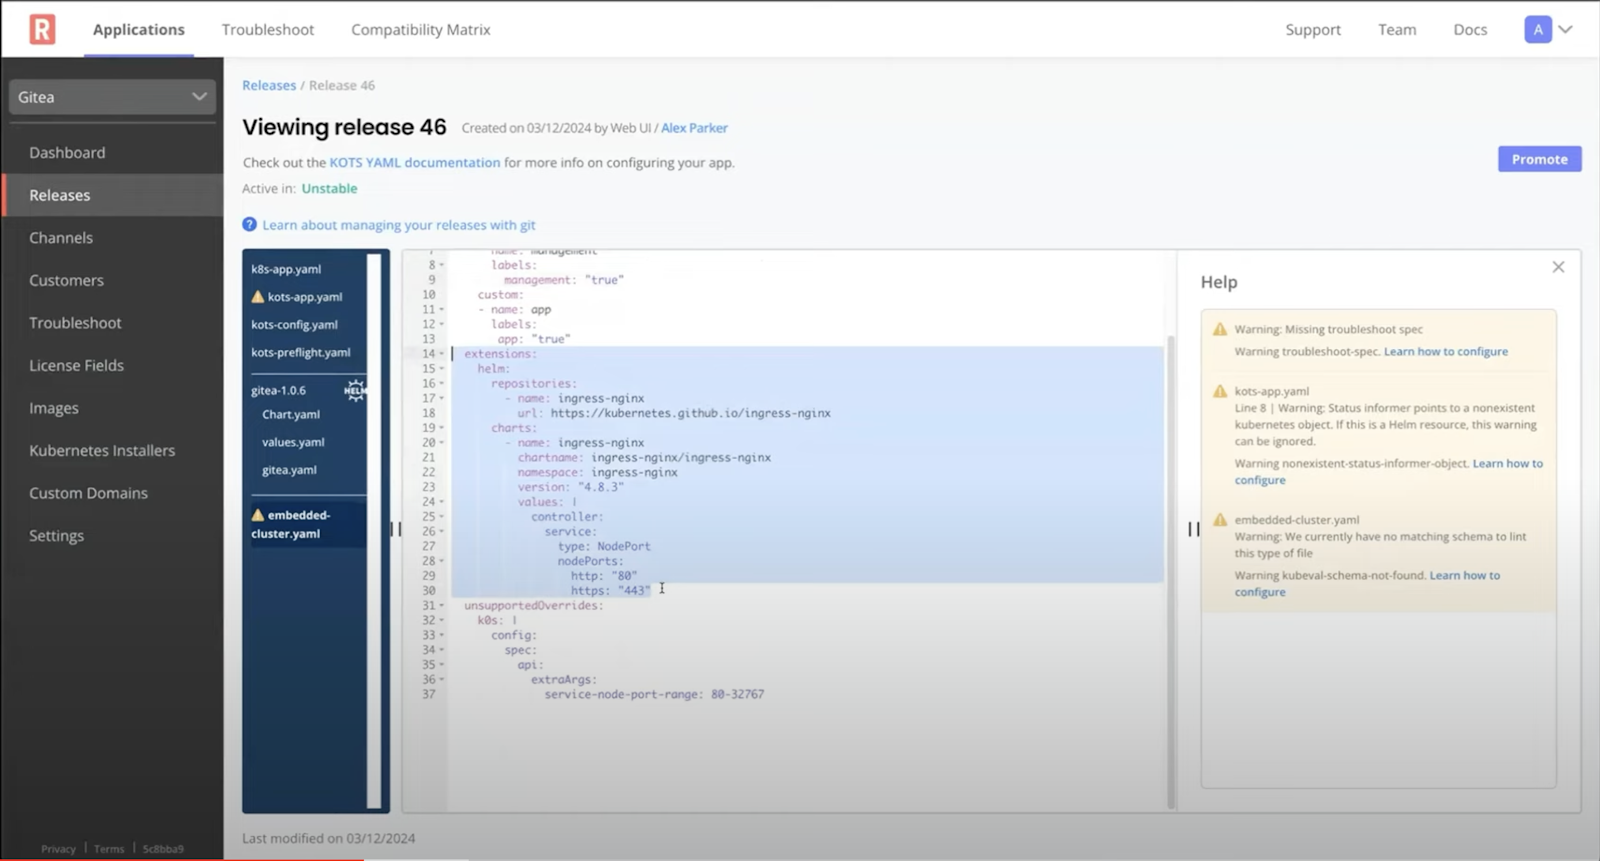
This is where you can specify the Helm charts that you want to include as part of the cluster. In this case, I'm deploying an NGINX ingress controller. There's not an ingress controller deployed yet as part of Embedded Cluster. A lot of our early testers are using this section to deploy an ingress controller.
But if there's other infrastructure things that you need to be there before your application, whether that's Istio or cert-manager or something else, this field is a great way to accomplish that. You can pass whatever values you want to that chart. It supports ordering if you have multiple different extensions you're providing and you need them to be deployed in a particular order that is also supported.
Finally, we have the unsupported override section, and this is where you're able to actually modify some of the lower level settings in the cluster.
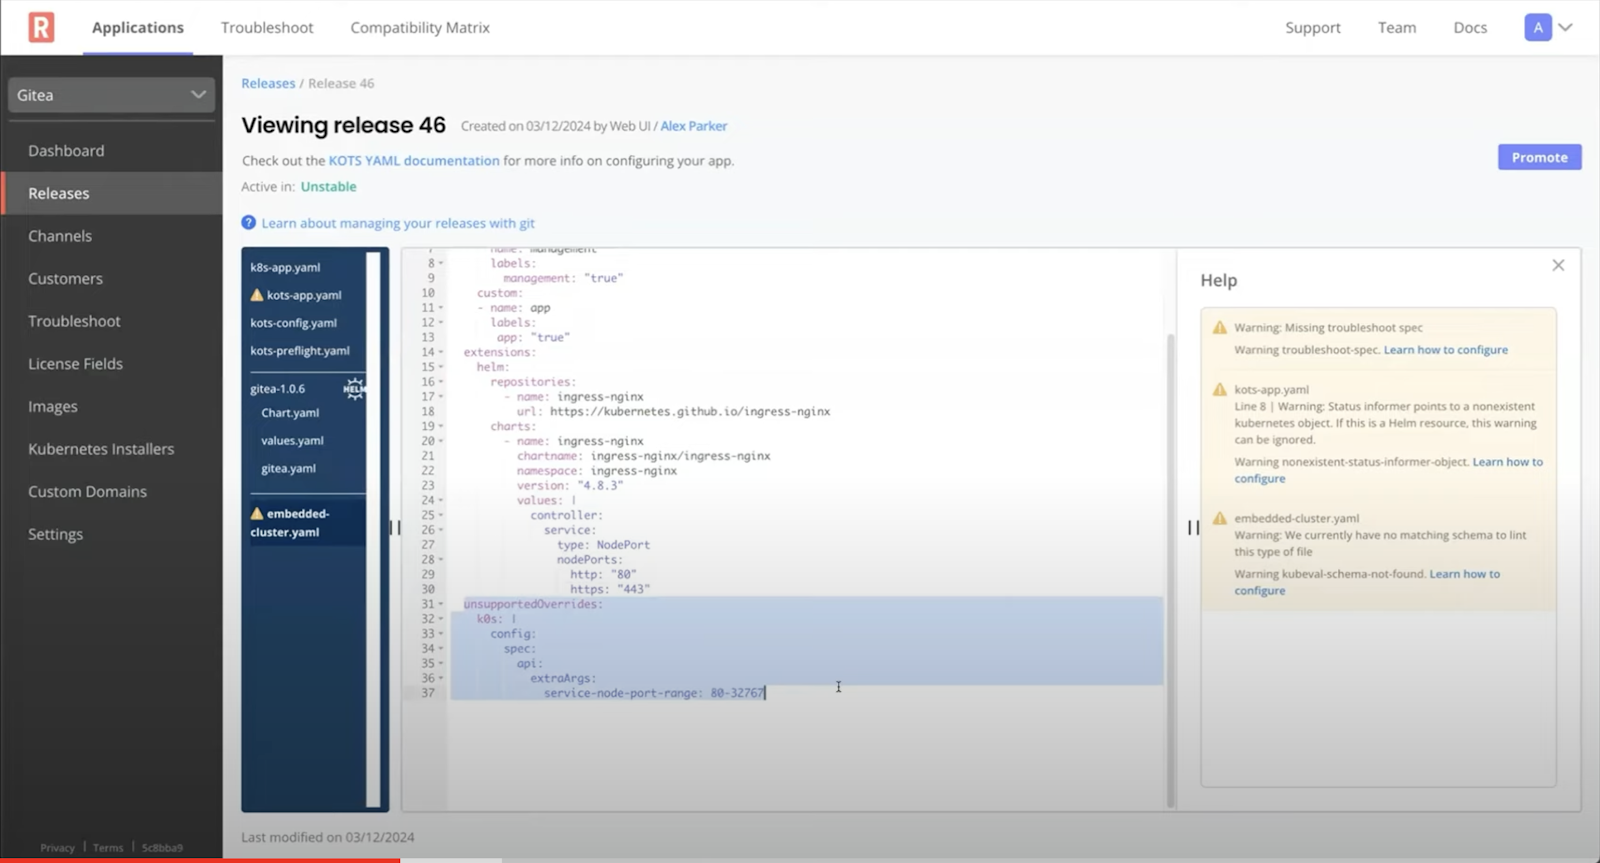
Currently this allows you to override the k0s config. The k0s distribution that we're using, you're able to change some of the settings, for how Kubernetes is deployed with k0s. There's a few caveats here. One of the benefits of this is that it exposes some of that lower level stuff that wasn't there with kURL and gives our customers the opportunity to customize the cluster without replicated having to develop new features all the time.
This exposes more of the settings and gives you a way to tweak them, try things out, without us having to go and implement every single thing on a feature level. We've seen people use this to deploy the NVIDIA GPU operator and set some container D settings that they needed to do. Let’s people test ahead of us.
The goal is that any sort of reasonable changes that need to be made here, if you come and talk to us about them, we'd like to productize those. If there's things that you need to change about the cluster and we say, ‘Oh yeah, that's reasonable, that makes sense. We'd like to productize that,' we can move that up into the Embedded Cluster config, but this gives you a way to modify things that we haven't productized yet.
You'll note that this field is called ‘unsupported overrides’ because changes here aren't necessarily supported. That doesn't mean that just because you put something here, your cluster's not supported anymore, but it means that changes here, if they break the cluster, are not going to be replicated’s responsibility. There's a couple of caveats there, but it's proved very useful for early testers and gives us a lot of cool feedback without us having to work on things that we just didn't have the time or bandwidth to do yet. So we have the config and the license is enabled, let’s look at our next step…
How do I install my application in an Embedded Cluster?
The main way that you would install is you would download a tarball that's going to include two things. First is your Embedded Cluster binary. That is basically a CLI that enables you to install and manage the cluster, as well as a license. This tarball is customer specific. It has a general binary that would install your application and then it has the customer's particular license. You can then run the install command and provide the license flag to pass that --license in and thus the whole installation process is gated by your customer having an appropriate license.
How do I get that installer? How do I get that tarball? Well, there's a couple different ways. The first is that your customers could download it from replicated. This is a cool option because it supports white labeling with a custom domain.
You can use your own domain as the gateway for downloading the installer. The download and installation instructions are available on the customer page in the vendor portal for you to pass on to your customer. We can see a screenshot here of that, where I first kURLed this replicated endpoint, passing my app slug and my channel slug.
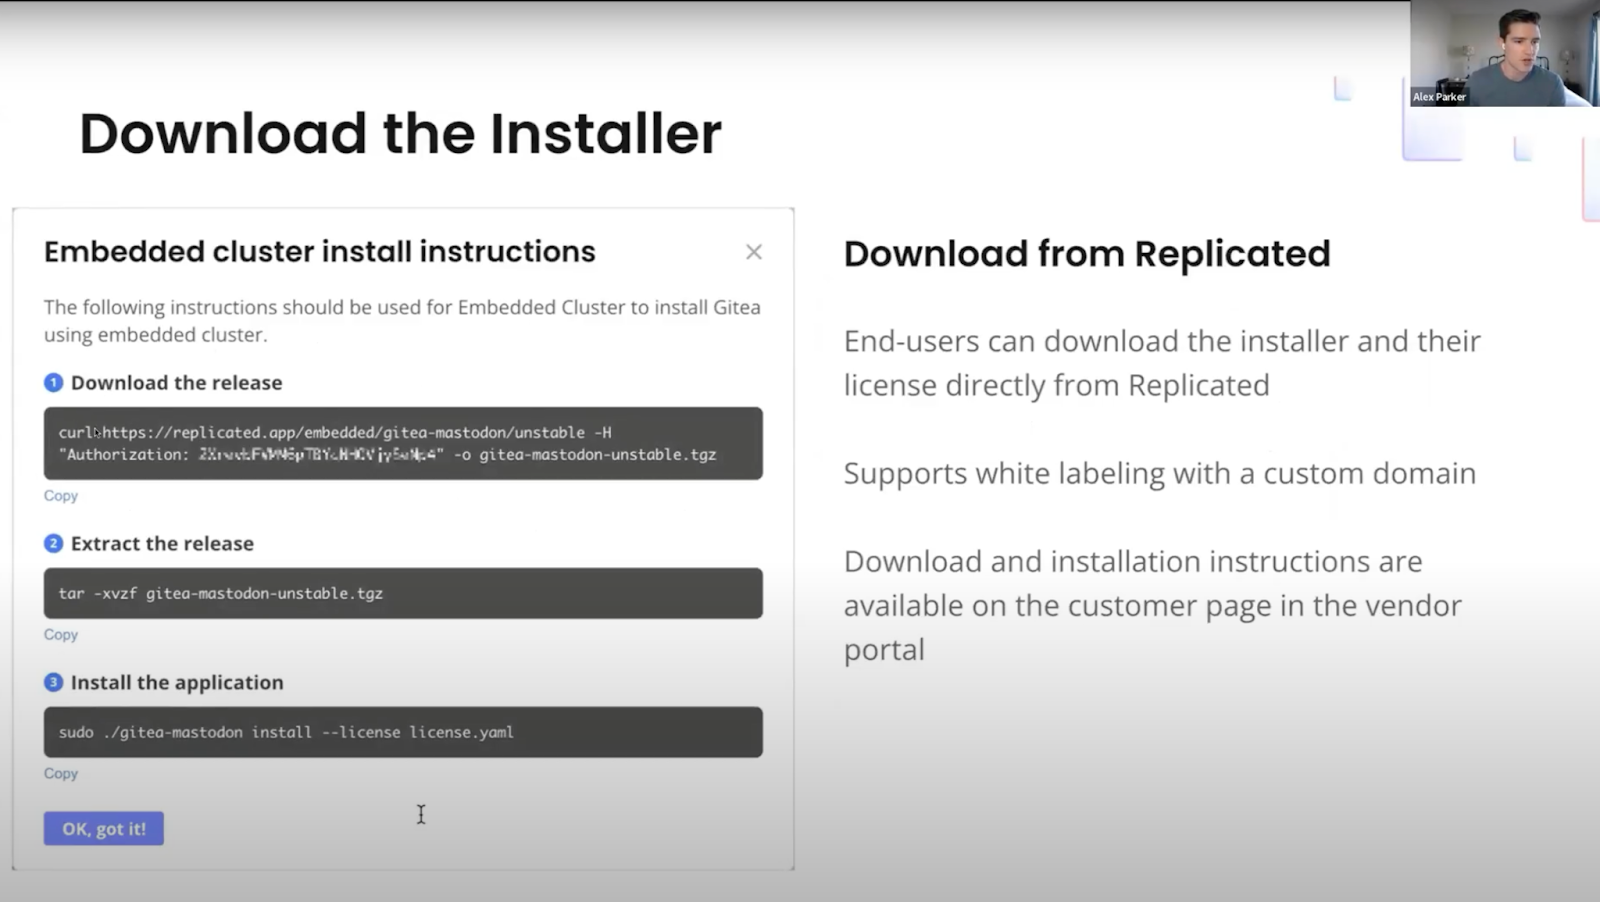
The license ID is used as the authorization header here. This is going to download that tarball. This supports a custom domain, this could be curl download.mycompany.com that you can white label. Then you extract all of those artifacts from the tarball and run the install command and pass the license in. That license and that tarball are in the working directory after you've extracted that release.
That's the first option and the one that we generally recommend for people to use. This lets your customers go straight to the machine where they're going to install the cluster, run these commands, and download the artifacts right to the host where they're going to install the Embedded Cluster.
But some of our customers prefer to host these resources themselves for various reasons. In that case, to host it yourself, the installer can be downloaded with replicated's vendor API. As an example, this supports vendors that want to host the installer themselves or serve it through their own customer portal. We have customers that don't use our download portal, but instead they have their own portal that their customers are already logging into. Instead of needing more credentials or more ways to get things, they serve all of the needed artifacts through their own customer portal. Allowing this vendor API endpoint to download an Embedded Cluster release gives you the ability to do that as well.
Demo:
Install
Let's do some demonstration of the installation process.
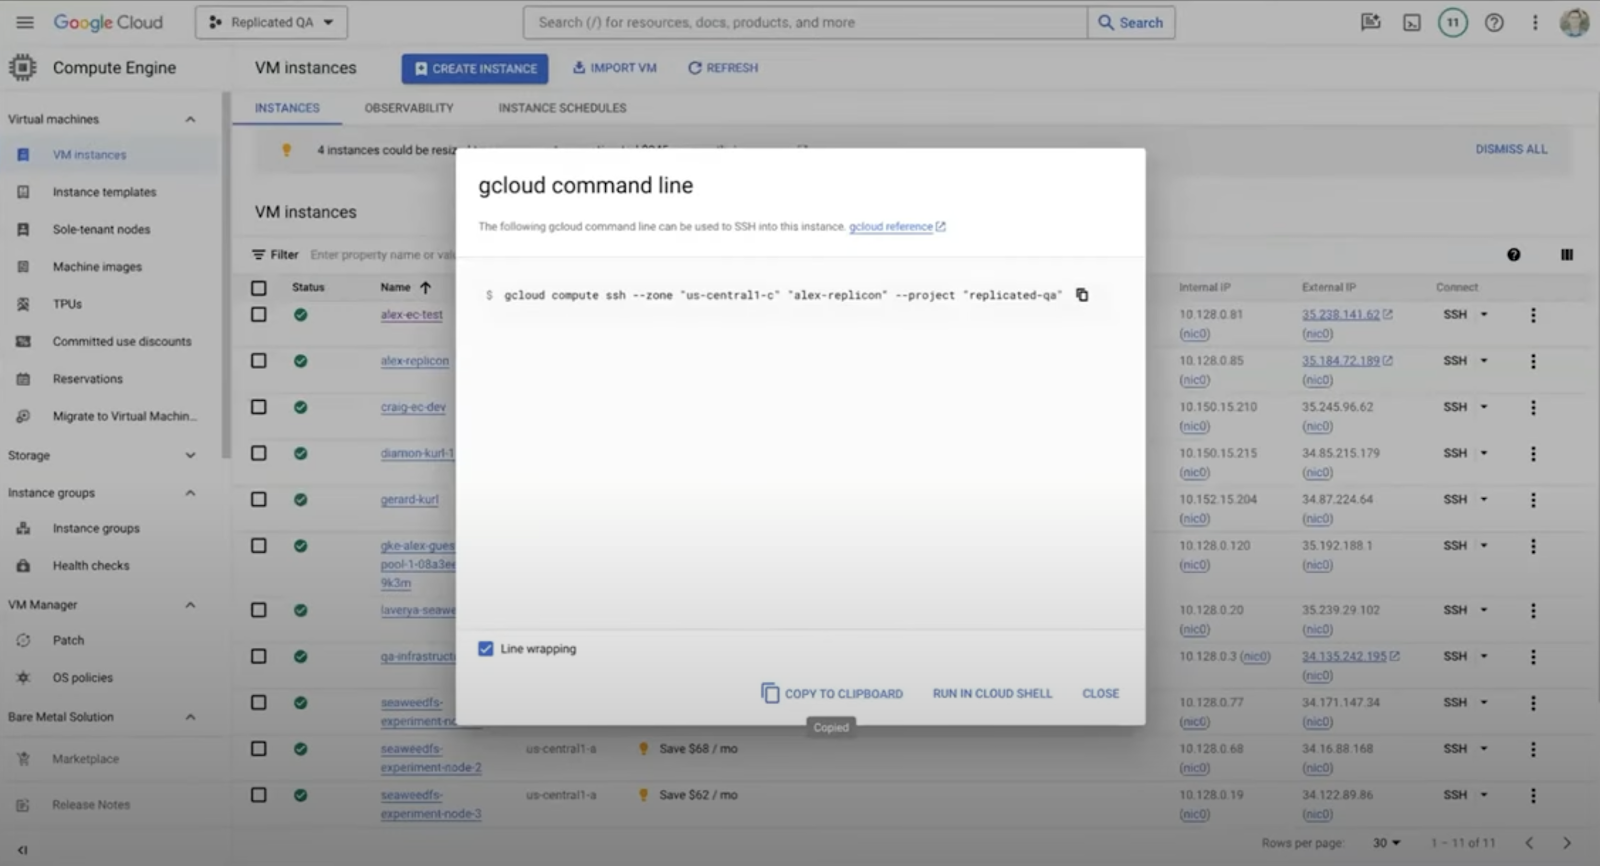
We mentioned that the install commands are available on the customer page. If I come back to my Embedded Cluster enabled customer and I go to install instructions, I've got my Helm install instructions, and we've recently added Embedded Cluster.

If we come over here to the terminal, and if I SSH into my machine, I will start downloading this tarball. It's about 250 or 280 megabytes, that'll take a couple of seconds to download. While we're waiting, I'll come back and copy the next command to extract that release and then we'll be ready to go ahead and install it.
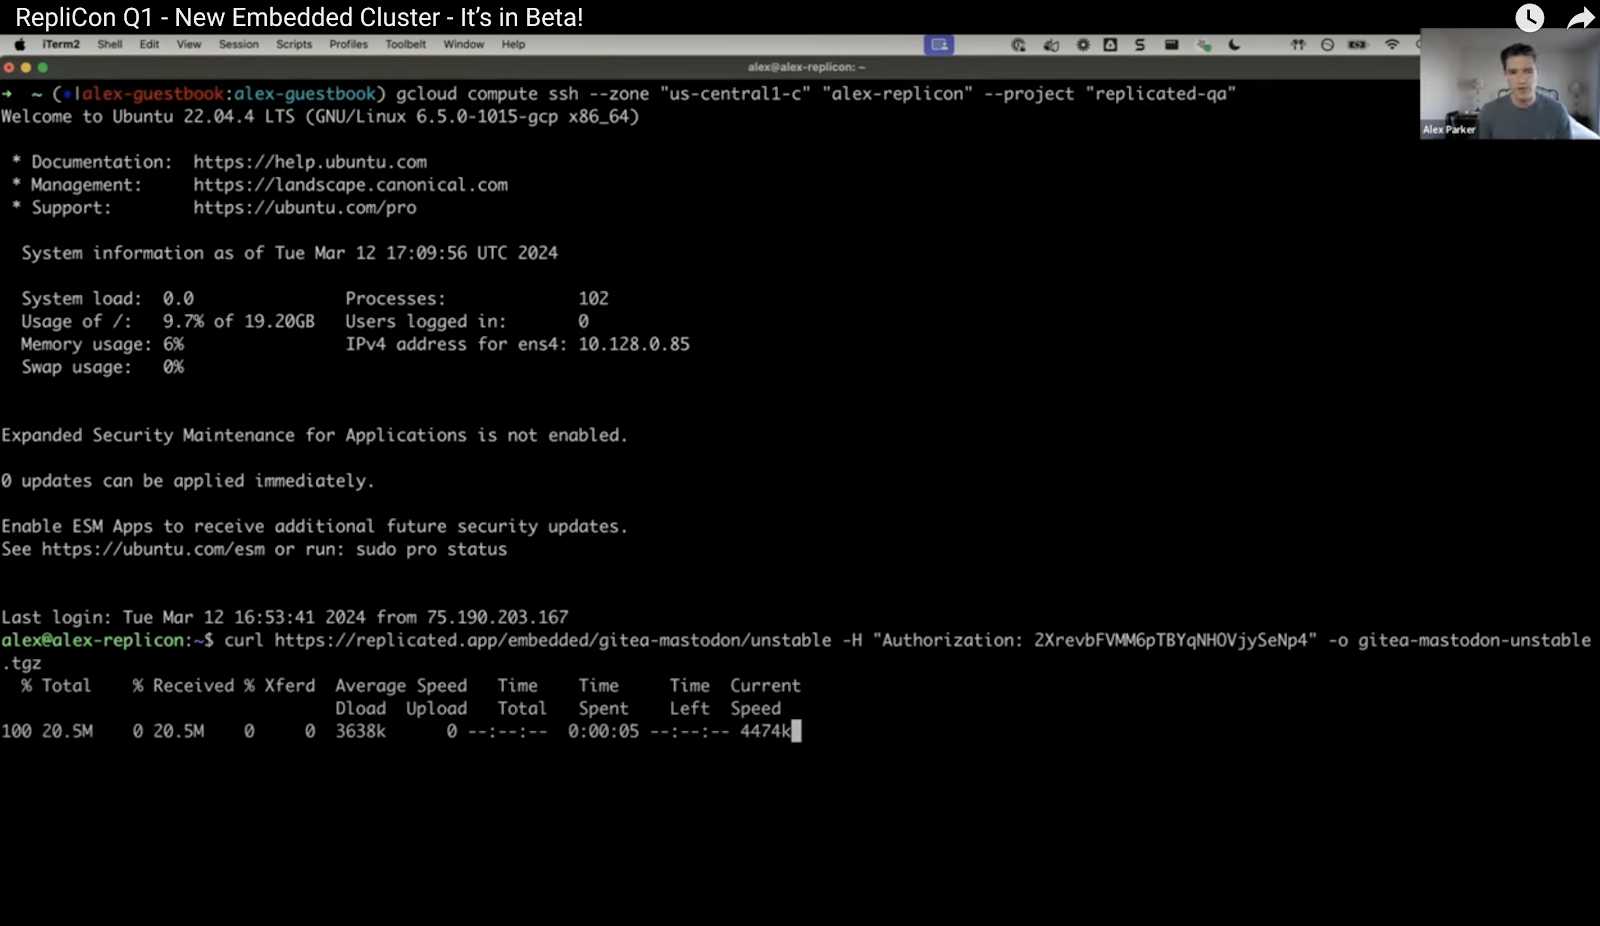
Remember that you don't have to expose replicated it to your customers necessarily. You can customize that with a custom domain.
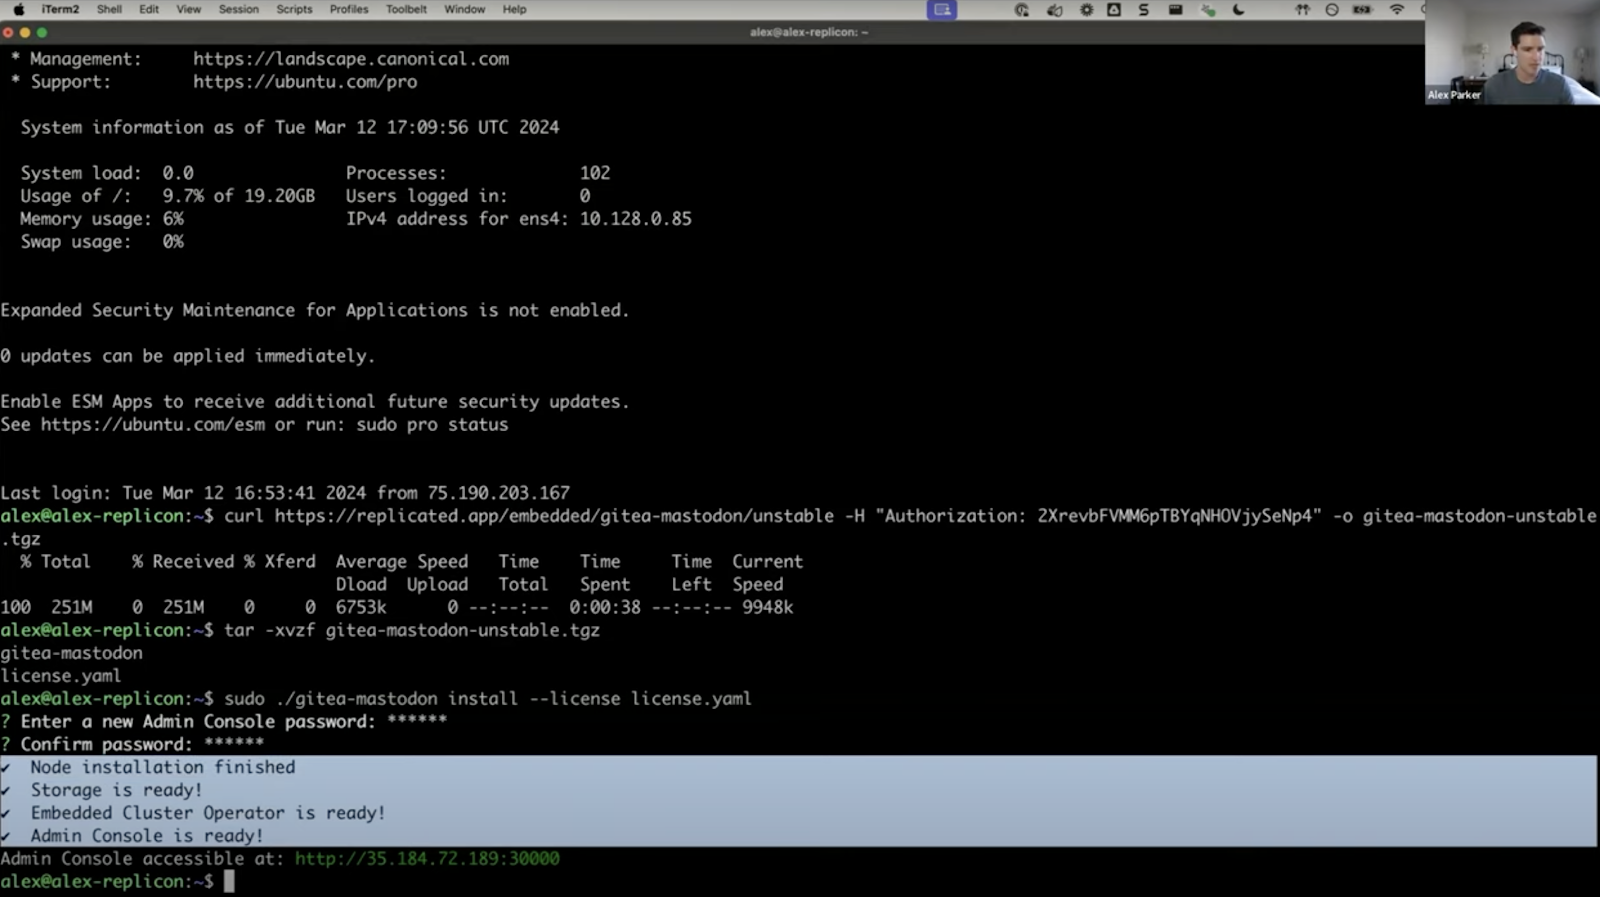
We'll extract that and then start the installation process.
This is going to prompt me for a password for the admin console. Then we're off to the races.
We mentioned this at the last RepliCon, but for anyone that's familiar with kURL, one of the really nice benefits here is that we're going to see much simpler and much more user friendly output as a part of this installation process.
We do log additional things to a file. If we need to debug there's the ability to see more granular and detailed information. For your customer that's installing this, this is going to be a much easier, and simplified installation process that's not going to overwhelm them with so many Kubernetes details and so many fine grained logging messages.
This is going to show me ‘when is my node installed?’
Kubernetes is installed on this node already. That took probably less than a minute. We're going to deploy storage. We're going to deploy an Embedded Cluster operator that helps to manage some of the life cycle of the Embedded Cluster. We're going to deploy KOTS, and then you'll have the admin console, and in this case I added that Helm extension for the NGINX Ingress controller, that'll take a little bit of extra time because I'm adding a dependency that we need to install, but within about 4 minutes that should all be installed.
We'll print out the admin console URL and then your customer would proceed to the admin console to finish the setup.
We can go back to the presentation and return to see how the installation wrapped up.
Update the Application and the Cluster
We were talking about this being like a software appliance, so updating the cluster really seems part of the application so that the whole cluster update experience should be relatively transparent to the end user.
It should feel like they are managing, installing and updating your application. That's where these unified updates come into play. This is one of the key points that I've been driving home, is that customers should feel like they're installing and managing your application, not a Kubernetes cluster and your application.
That's what we mean when we talk about this being an appliance like experience. Deploying updates in the admin console is going to update both of those two things together. In fact, there's not two buttons you have to click. There's not an update cluster and then an update application button or anything like that.
It's all going to happen in one step as part of that update. In a second, we'll get into a demo where I'll actually promote a new release, change the Embedded Cluster version and return to the admin console to update that. We'll see how that's going to update both the cluster and this together.
I'd like to mention that this experience is a big change for replicated and for our Embedded Cluster solution. This isn't how things worked in kURL. If you're testing this or if you're starting to work with Embedded Cluster, this is one of those workflows that we'd really like to get feedback on to make sure that the way this is implemented works appropriately.
When we're updating the application and the infrastructure together, there's always the possibility, depending on how it's implemented, that if the cluster is updated at the wrong time and you have something going on in your application and that gets interrupted, a problem could ensue.
We want to make sure that we're getting the right feedback because this is one of those features that is a big deviation from how kURL worked. We'd love to get as many people using it as possible and make sure that when their application updates alongside the cluster, they don't see any strange behavior that we would need to address.
If you're not already testing with these updates and you're just installing and reinstalling to test your application, try out one of these updates, see how it works for you and let us know what you think.
Let's come back, we can see this just wrapped up. Again, that's simplified output, we see the basic steps that happened here and then we get our link to the admin console.
Let's proceed, we need to upload a TLS cert of some kind to secure the connection to the admin console. We're on HTTP right now. We want to use HTTPS.
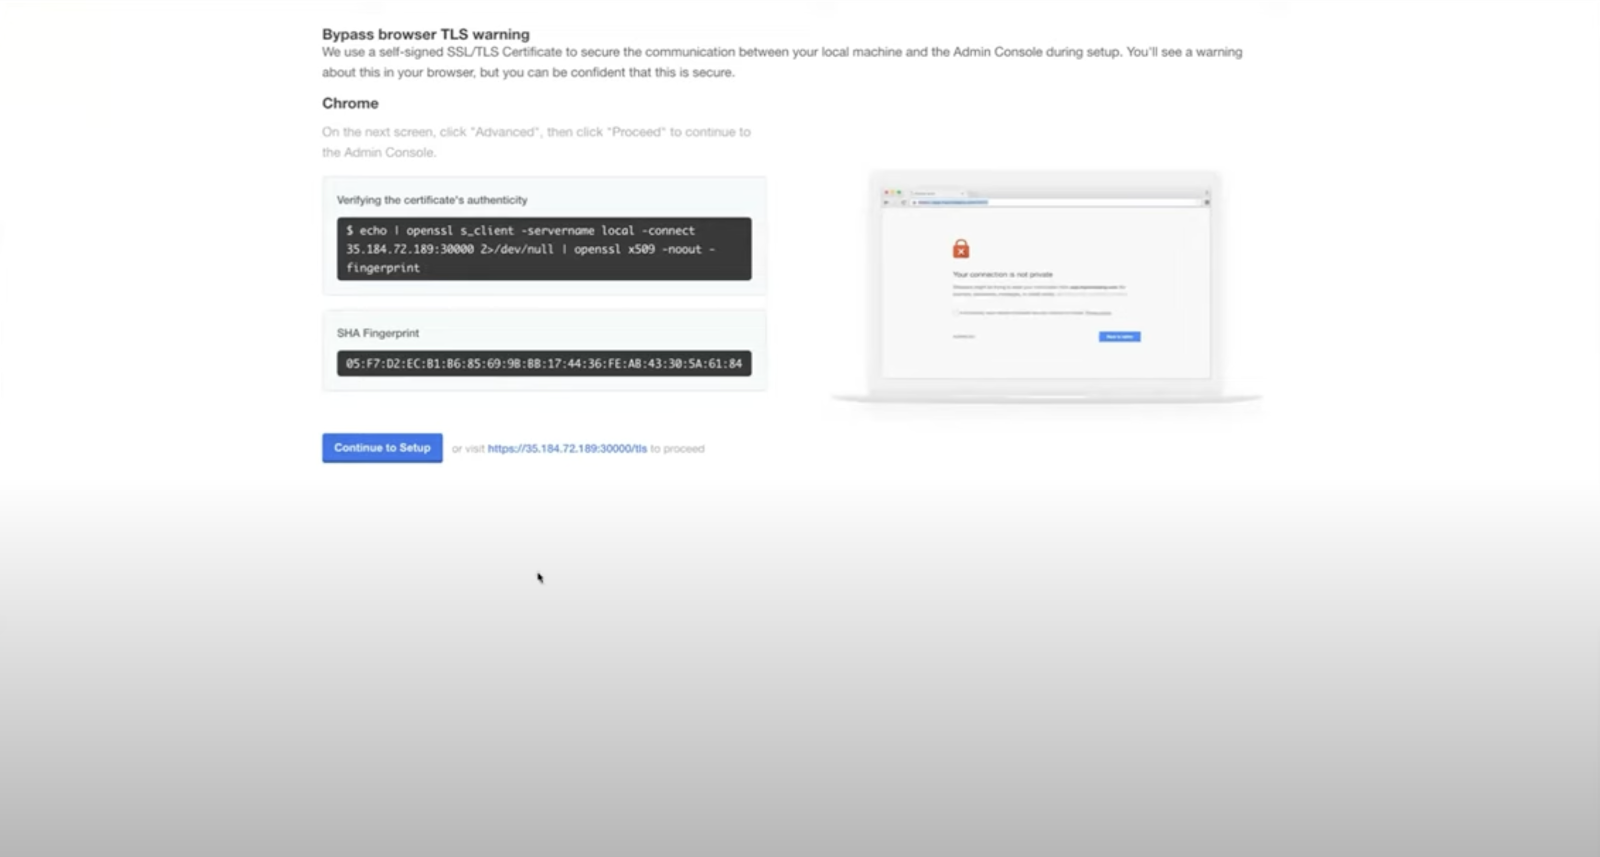
I'm going to use a self signed certificate here, then I'm going to get dropped into the admin console, use the password that I provided.
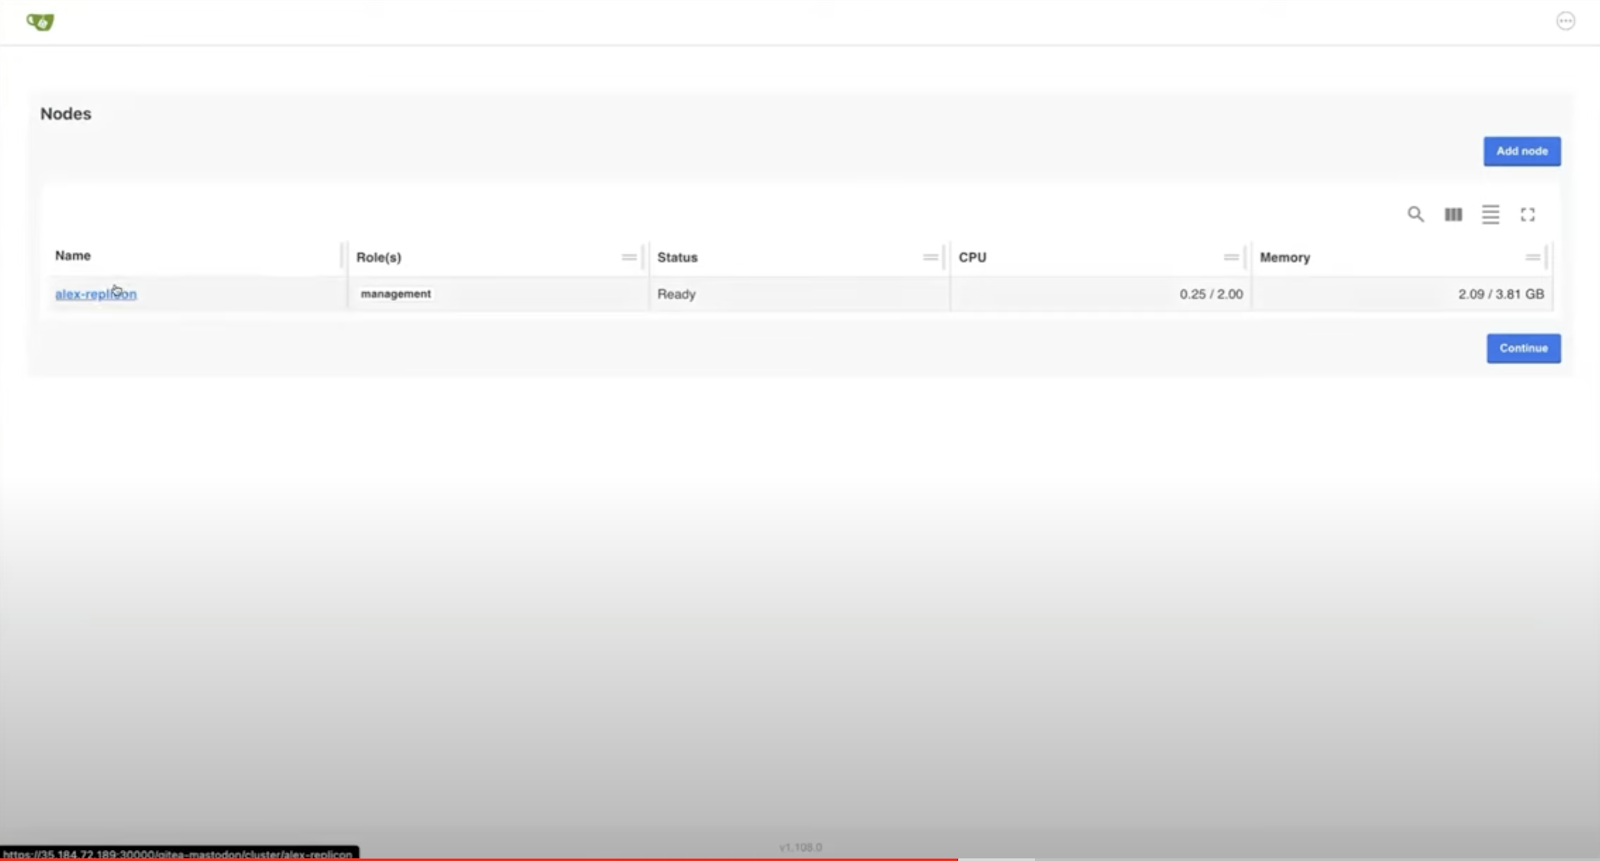
Then on this modified cluster management nodes page, I can see my one node that I have here and what's running on it. I can add a node, we will come back to multi-node clusters in this presentation.
I've got my normal application config, run these preflights real quick and then go ahead and deploy my application. That's the installation process.
Let's go ahead and talk about the updates now.
Back to my releases page, I am going to look at my new release that I've already created. You notice that before I was deploying, 128.7, I've changed this to be 129.2.
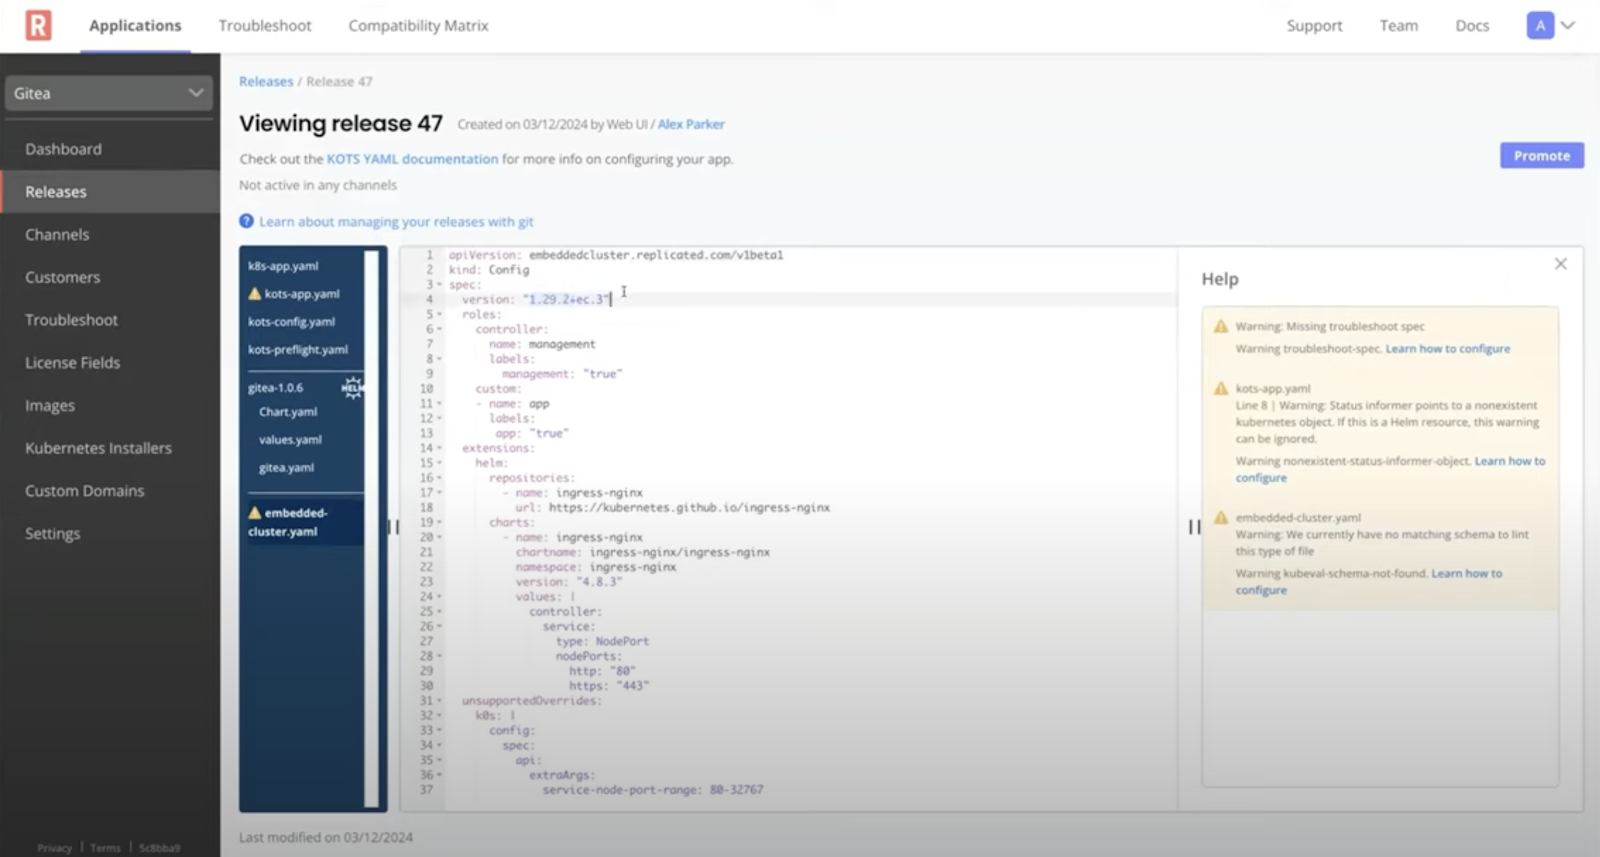
This is a new Embedded Cluster release with a different Kubernetes version. We're releasing the latest Embedded Cluster changes on both 128 and 129.
Over time, we'll expand that to be all of the in support versions of Kubernetes, but whether you've tested your application on 129 or not, you can get the latest changes for Embedded Cluster on both 128 and 129. If you look at our releases page, you can see 129.2+ec3 and 128.7+ec3, and if you were to read the changes, they're the exact same changes.
These are basically the same two Embedded Cluster versions, but they will deploy different versions of Kubernetes effectively. So what I've done here is updated to the latest Kubernetes version. Go ahead and promote this to unstable. Come back, everything is ready.
Let's check for updates.
Demo:
Update
All right, got my new version. The preflight checks are running and I'm just going to go ahead and deploy this.
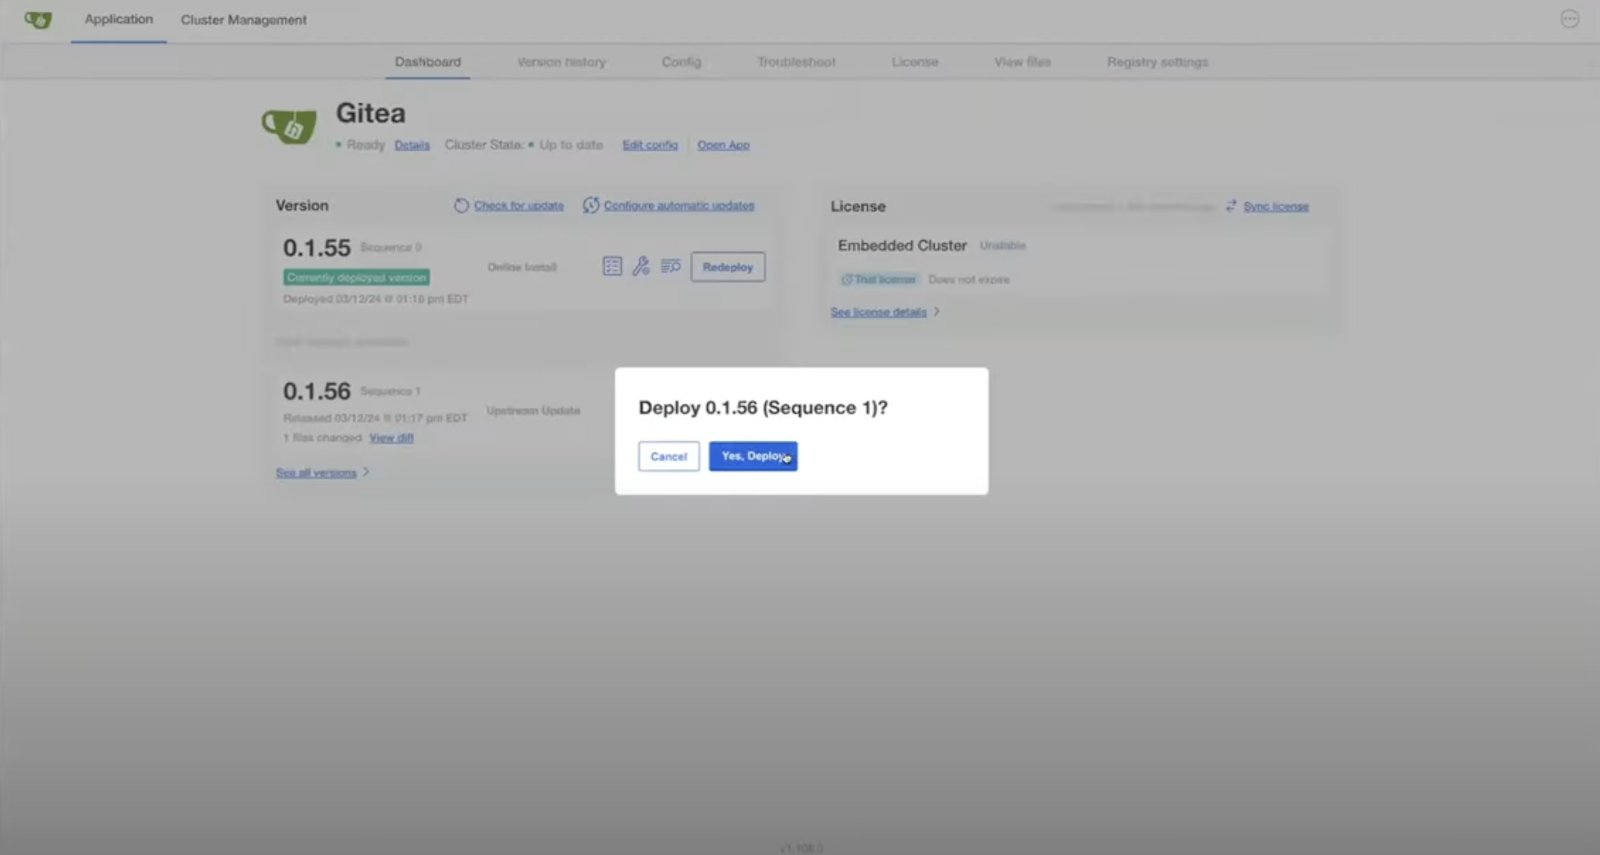
I didn't make any application changes here for the sake of demonstration, although you could. What's happening first is any changes to the application are getting deployed.
In my case, there were none because I didn't change the app. Now you'll see we've shifted into this updating cluster phase of things. This is where we're actually starting to upgrade the cluster. You'll see the cluster state has changed to upgraded. In this case, we're on a single-node cluster. I only have one node here.
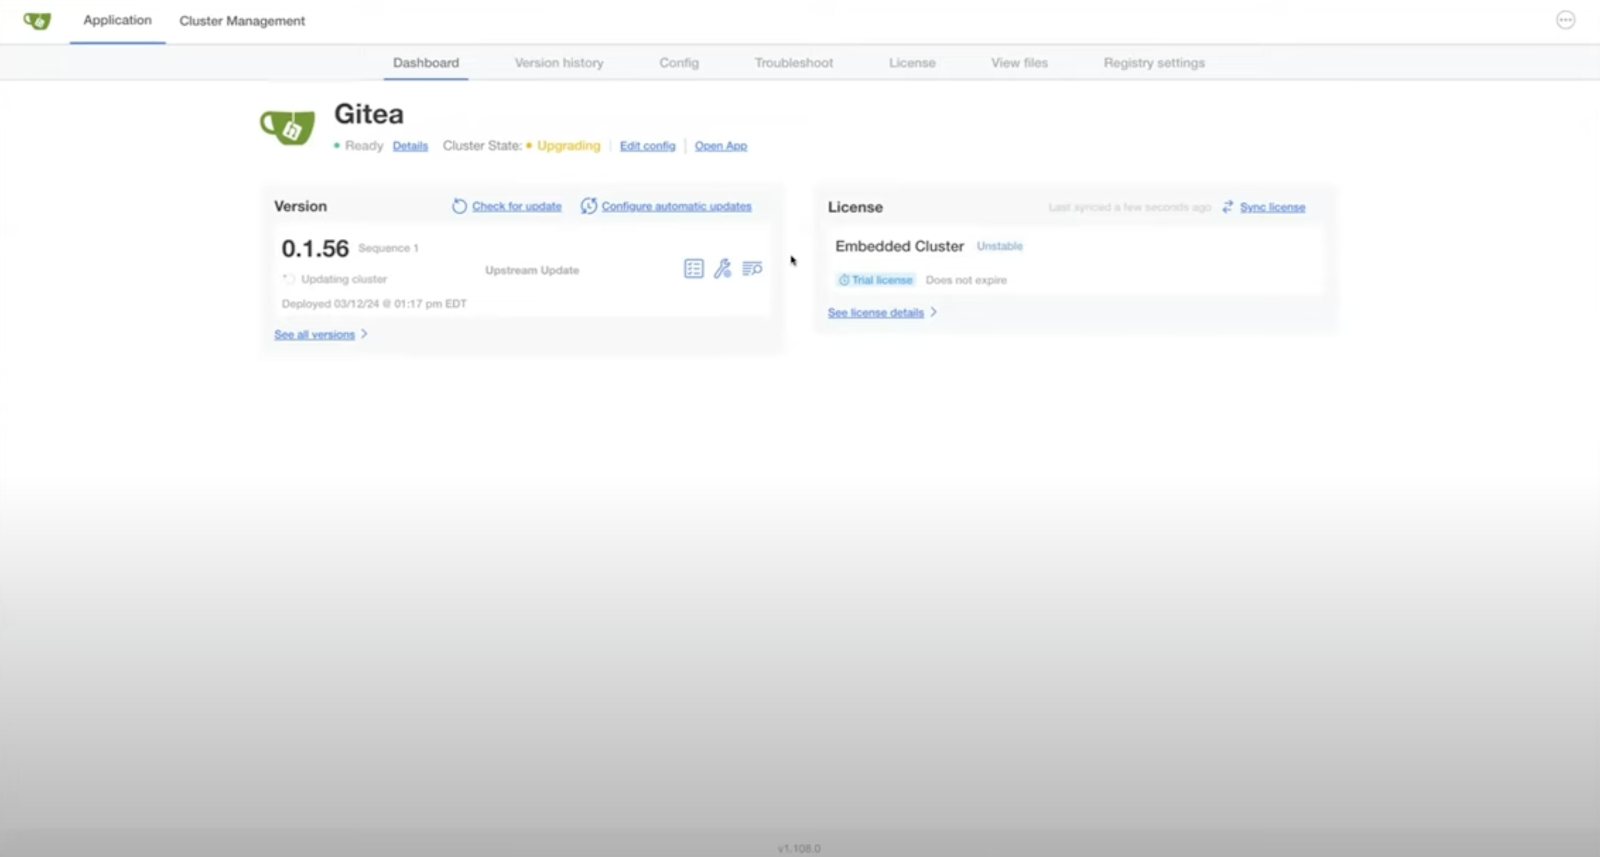
As part of the upgrade, eventually KOTS is going to lose connection because the KOTS deployment is going to go down as part of this upgrade. We have messaging that we've added into the admin console to show that a cluster update is in progress.
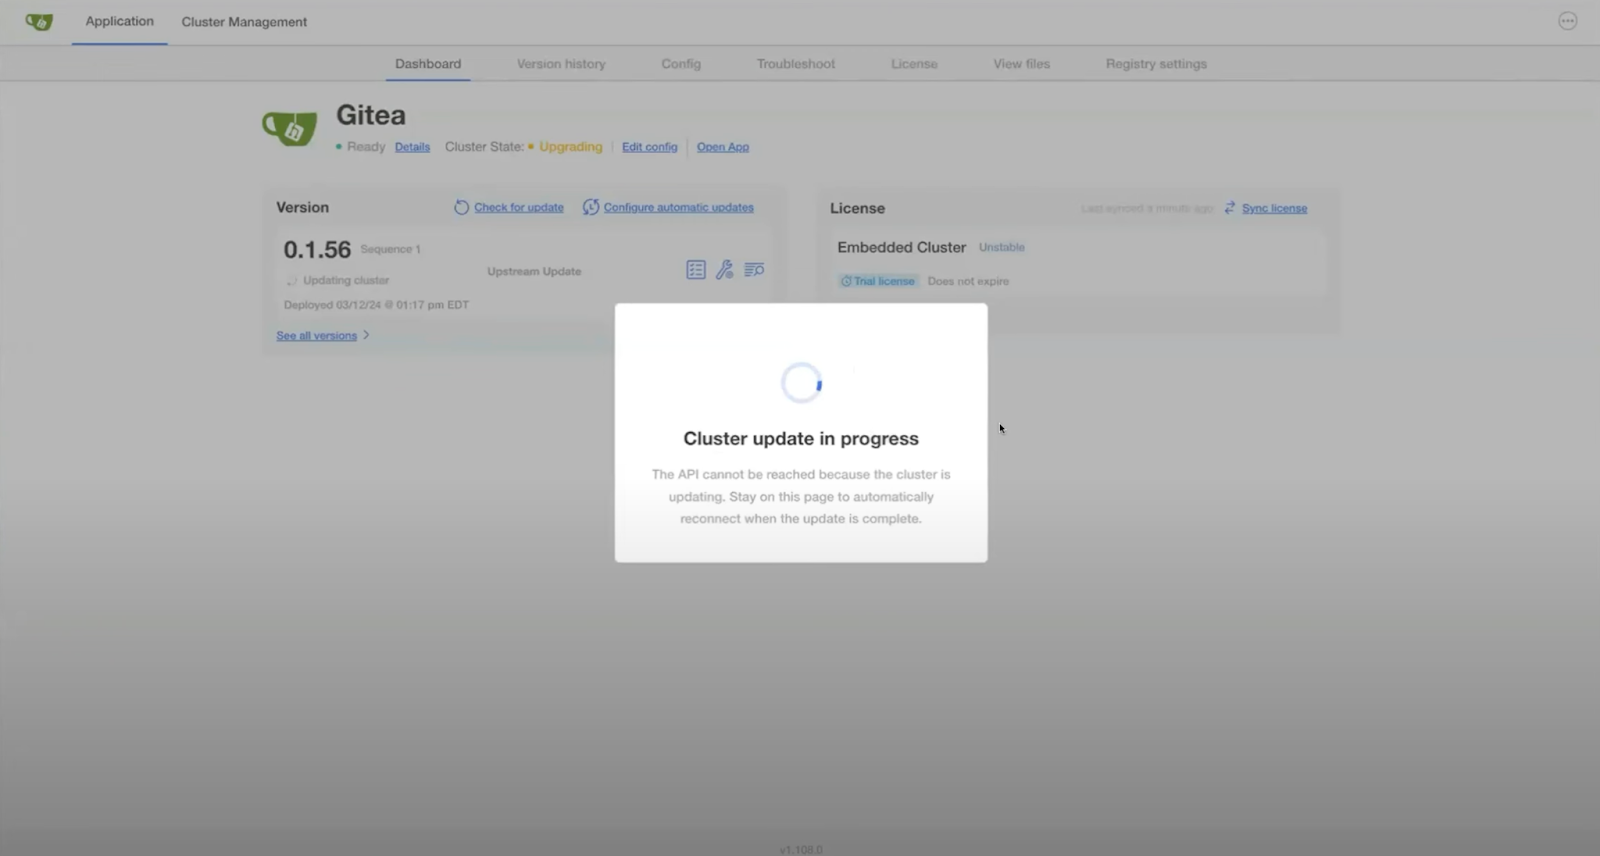
That's just an inevitable part of having to upgrade the Kubernetes version here and having to drain the node and do the infrastructure updates. When I'm updating the cluster, I get this message but once everything comes back, this page is going to reconnect and bring you back into the admin console.
We'll continue on with the presentation and check out this update when it's finished in just a couple of minutes.
Multi-node Clusters (Alpha)
Let's talk about multi-node clusters, which are in Alpha support right now. We do have enhanced multi-node support for multi-node clusters and Embedded Cluster. Here's my Embedded Cluster config, this gives me the ability to define node roles with associated Kubernetes labels.
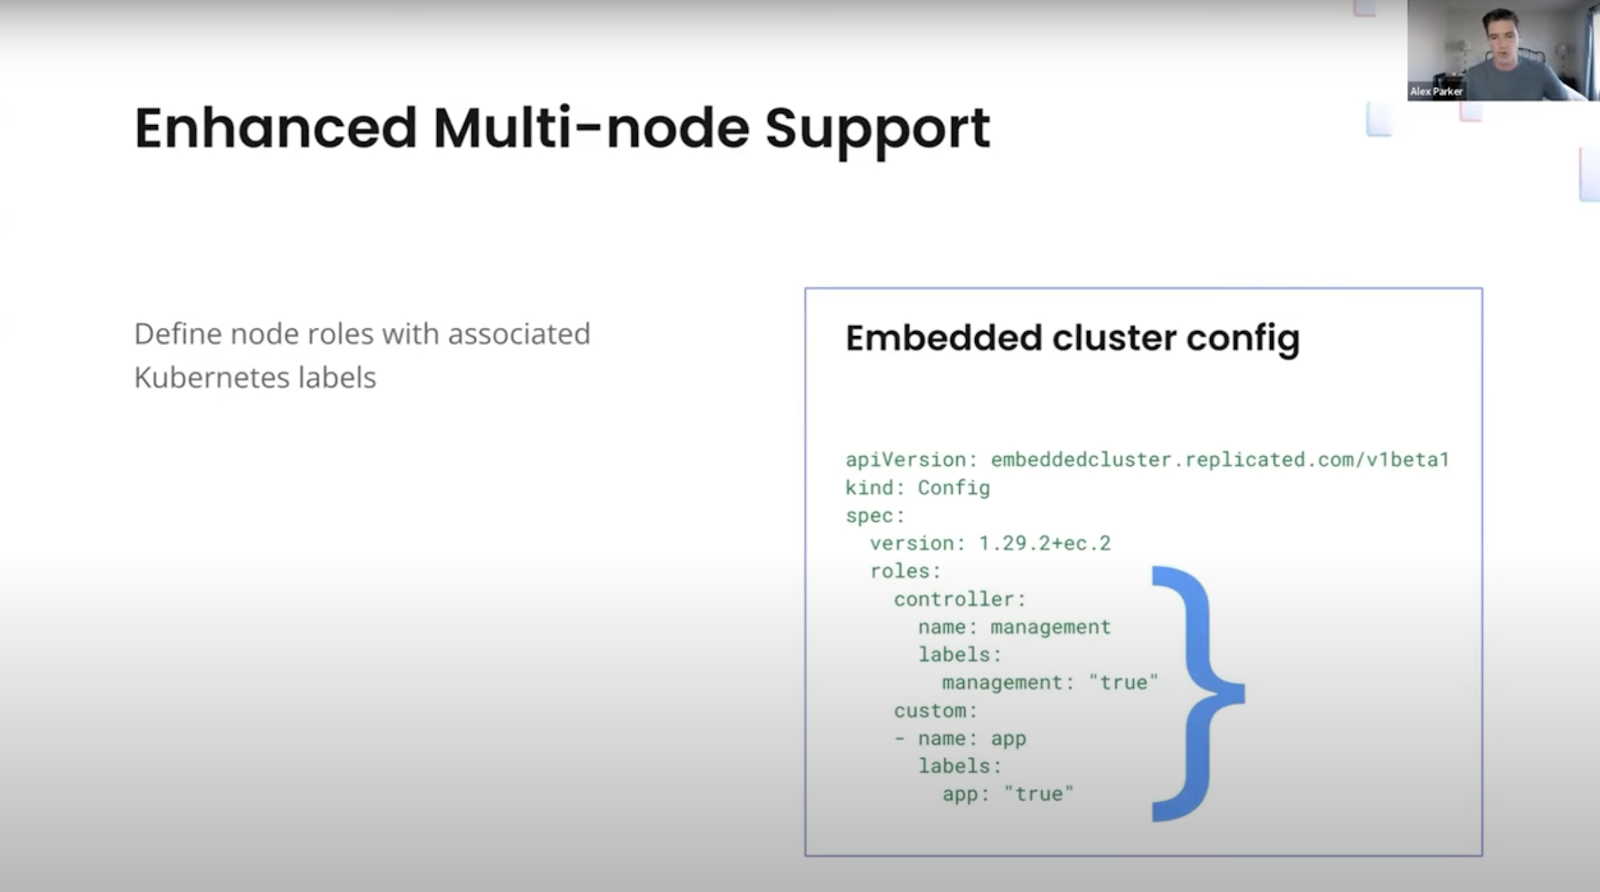
This is a really cool feature because it's a great example of abstracting away Kubernetes from the cluster. We have customers today who use multi-node curl clusters and they have to tell their customers: when you join this node use kubectl and run kubectl to label this node with these things and label that node with these things.
That's leakage that we're trying to avoid. The breakthrough of those Kubernetes implementation details into the end user's experience. In the admin console there is the ability to select a role and say ‘I need to add a database node, an application node, a web node, or a GPU node or whatever it might be…’ Making that into human readable roles that automatically apply the appropriate labels, I think it's a great example of a goal of this project and abstracting Kubernetes away.
The node joins happen equally fast, because of how fast the cluster is able to spin up. It's really quick in comparison to get - two, three, four, five nodes spun up in just a matter of minutes. In the future, part of what we'd like to do with multi-node support to take it from Alpha to Beta to GA and beyond is helping define what a valid cluster looks like and being able to have better workflows inside of the admin console for setting up a multi-node cluster.
If you know that your customer is going to need a particular number of this type of role or things like that, we can make sure that they set up the right cluster before they proceed to deploying the application.
Similarly, we have plans for potentially being able to provide IPs and SSH keys to install multi-node clusters in a single command.
Node Resets
This is a great way to be able to remove a node from the cluster or remove the node entirely. If it's the cluster entirely, if you're on the last node, these are great for development, and iteration. We didn't have this well developed in kURL, but the ability to be on a single machine, reset it and start from scratch when you need to, helps decrease that development loop. It's also great for troubleshooting at customer sites, because a lot of the time enterprises can't easily procure new VMs.
If something goes wrong with the installation process and you need to start over, having to get a new machine can be costly and decreases the amount of time to get your app installed at your customer. So being able to reset makes this a lot easier and quicker.
I'm going to check the chat while that's going and just see if there's any questions here.
Chris Sanders : Is there any more clarity on when Multi-node will enter further stages, Beta and GA?
Alex: I don't have an exact timeline of ‘it'll be this month’ but it's an impending update for us.
Let’s talk about what’s upcoming.
Airgap
Airgap support is coming soon. The goal is to have a single airgap bundle with both the app and the cluster artifacts all inside of it that your customer downloads to update. That's in progress right now. We have an Alpha release expected in the next few weeks. This is another feature that if you're testing this out, would love to get your hands on this, once it's available, we'll let you know and get some feedback.
Multi-node Beta
Multi-node Beta is one of the next big milestones that we would have after airgap support. It's fully functional already, but the main steps we have left are trying to eliminate some of the foot guns when you're joining nodes and better validation.
Multi-node clusters work. We want to make sure that when your customers are joining nodes, they don't use the wrong version of the binary or join a node incorrectly in some way. There's some UX improvements we want to make to polish that up and make it more resilient and harder for people to screw up.
I expect that to be within the next couple of months we'd be pushing that forward, but it is fully functional. If you want to go test that out, definitely take a look.
Disaster Recovery
Disaster recovery is another one of our major upcoming goals for the next couple of months. This is going to be similar to today's snapshots functionality with Velero but more focused on disaster recovery.
Specifically, it's only going to support full backups, as opposed to the partial backups you might have seen with our current snapshots functionality. We'll only support off cluster backup storage locations, since if you lose the cluster you've probably lost the snapshots or the backups, on the cluster anyway.
Focusing on that disaster recovery use case with off cluster backup storage locations and then starting with that smaller scope to ensure proper functionality and testing.
Improved Unboxing Experience.
When I first opened the admin console, I had that TLS page, I had to advance through the security warning, and then I got put on the nodes page. We want this to be self-documenting effectively, when a user opens the admin console to get started, they should know what to do without having to read your documentation. It should guide them through that process in the admin console.
Introduction of a landing page and a more guided setup process, are some of these other steps we want to take.
So – that update is all finished, which is great.
Demo:
Reset
The last thing I'll show here in the demo is the reset process. If I try to install again, it's going to tell me ‘I've already detected an installation, if you really want to do this, you should reset first.’
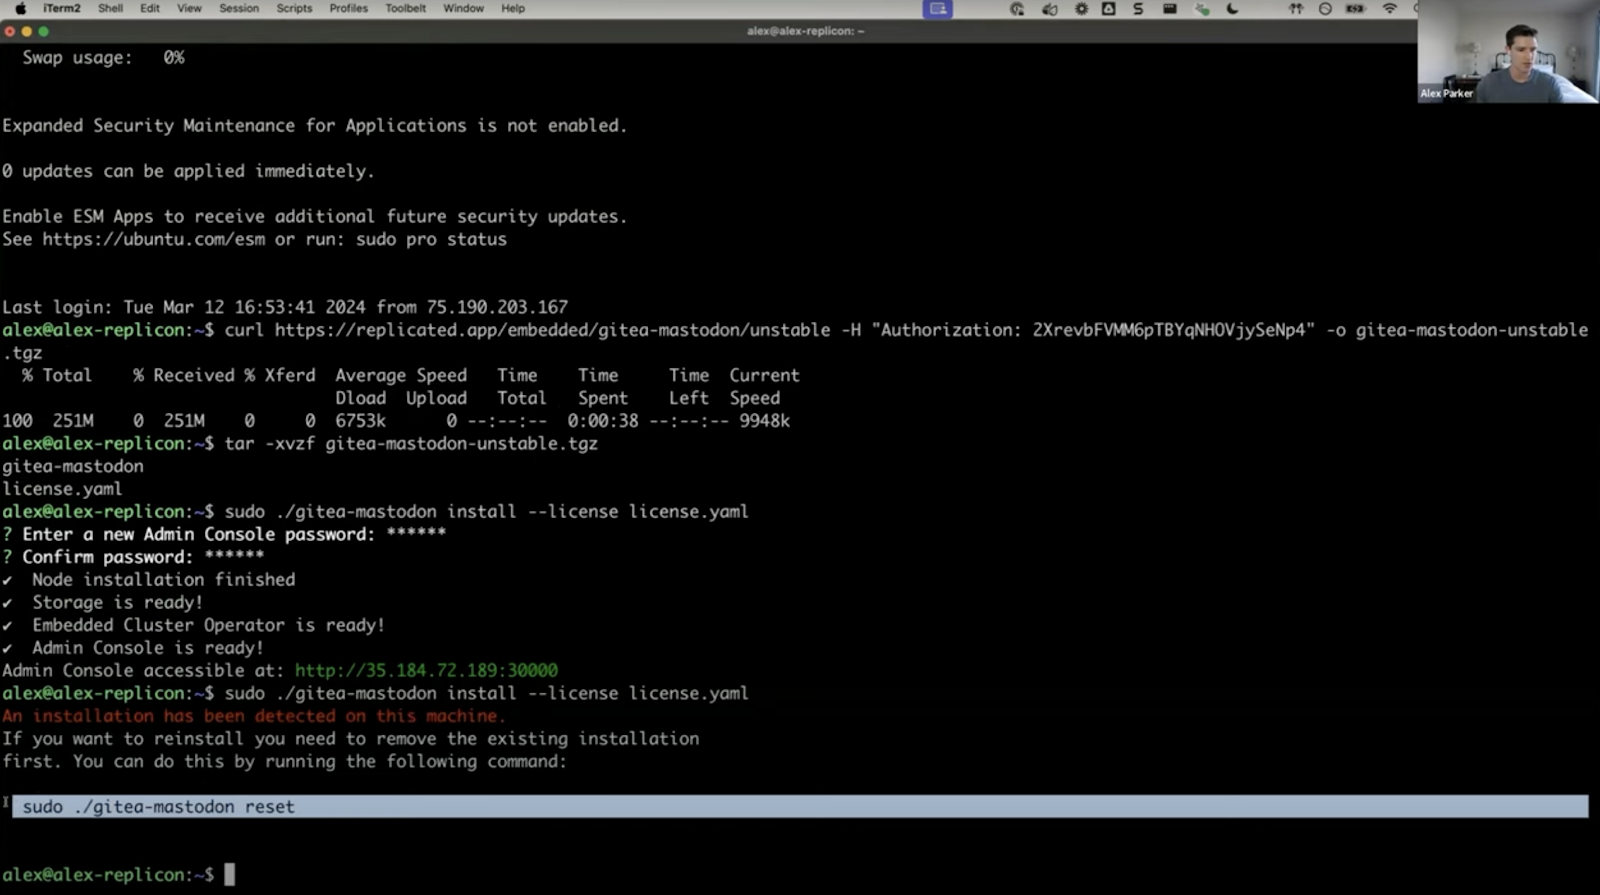
Let's copy that reset command and run it here. I'm going to confirm that, and this is going to proceed to eliminate the cluster in the application from this node. Give me a blank slate so that I can start over.
This should only take a minute or so, and that's just an example of how you can really decrease the dev loop and get your customers installed a lot quicker, as well, with these node resets. We've lost connection because I'm deleting the whole thing there.
And then you can see that it's already finished. So we're all set there.
The last thing here is to mention that we'd love for you to get started today. I've mentioned that feedback and validation is a key step for us to move this product towards GA. We've got a lot of people integrating and testing already. We've got documentation available at our doc site now, you can see a screenshot up there and I can provide a link for anyone that needs that.
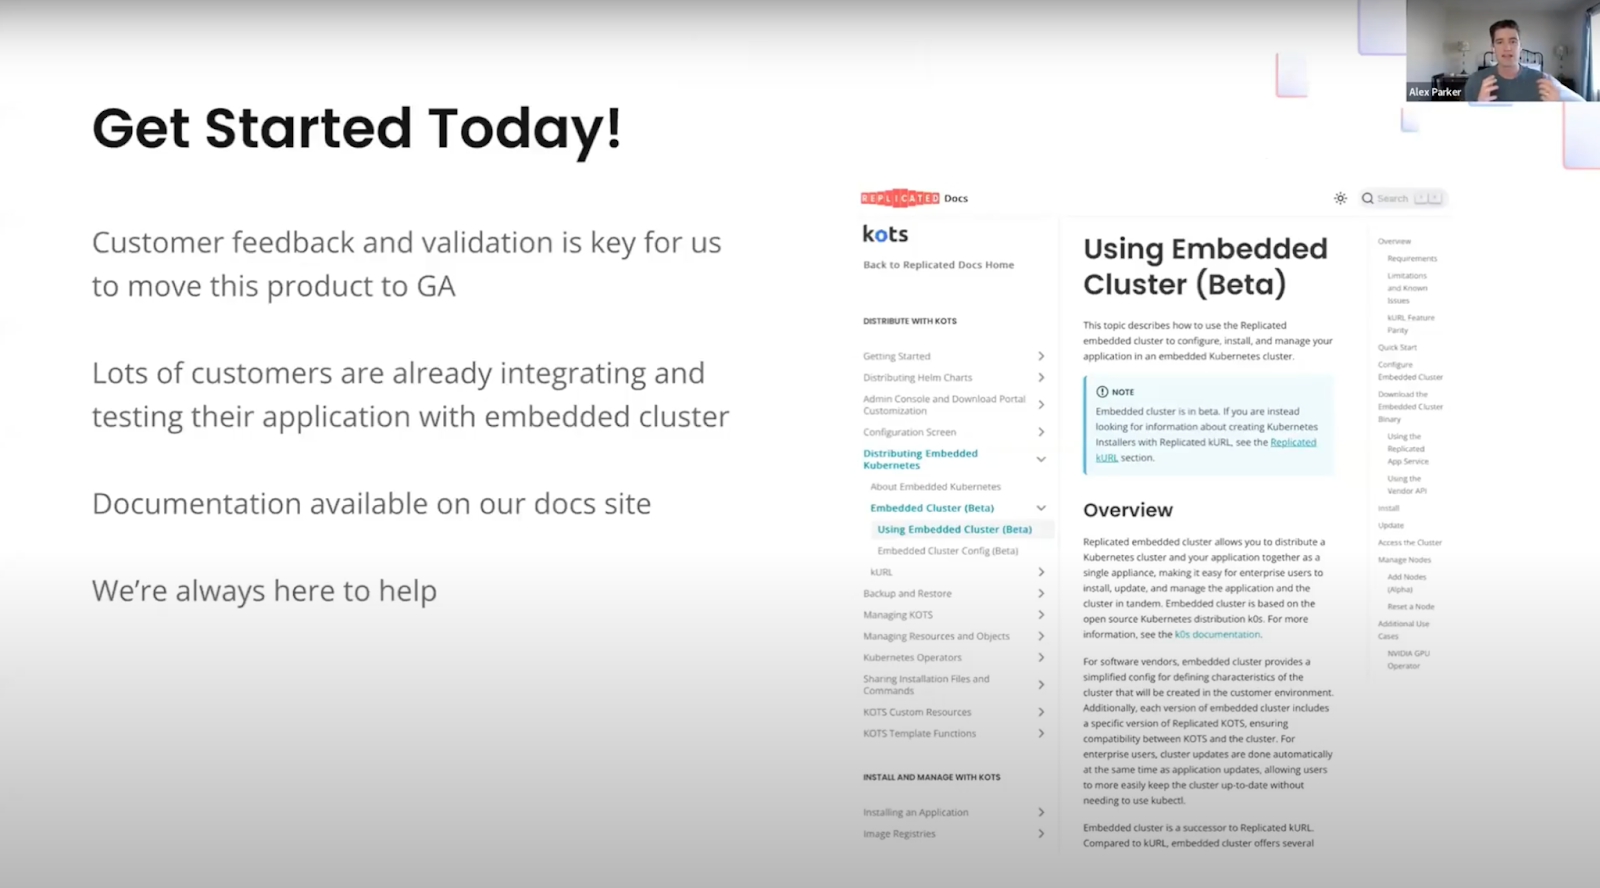
We're always here to help. I really mean that. This is a really big project and our team has been really involved with a lot of people that are testing this already. If you have questions, if you get stuck, if you need help setting something up appropriately, reach out to us, whether that's Slack, email, or through your account representative.
We'd be happy to get on a call, talk with you, help you get unblocked. Even implement things that'll help get you unblocked. We'd love to work as closely with you as possible. Feel free to reach out.